Hyundai Sonata: Air Conditioning System / A/C Pressure Transducer Repair procedures
Hyundai Sonata LF 2014-2019 Service Manual / Heating, Ventilation and Air Conditioning / Air Conditioning System / A/C Pressure Transducer Repair procedures
| Inspection |
| 1. |
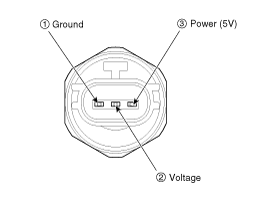
Measure the pressure of high pressure line by measuring voltage output between terminal "1" and "2".
|
| 2. |
Inspect the voltage value whether it is sufficient to be regular value or not.
|
| 3. |
If the measured voltage value is not wihtin specification, replace the A/C pressure transducer. |
| Diagnosis With GDS |
| 1. |
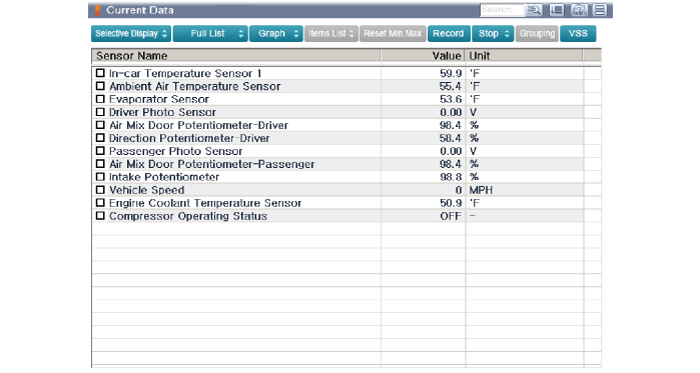
The heating, ventilation and air conditioning can be quickly diagnosed failed parts with vehicle diagnostic system (GDS).
? The diagnostic system (GDS) provides the following information.
(1) Self diagnosis: Checking the failure code (DTC) and display.
(2) Current data: Checking the system input/output data state.
(3) Actuation test: Checking the system operation condition.
(4) Additional function: Other controlling such as he system option and zero point adjustment. |
| 2. |
Select the 'Car model' and the system to be checked in order to check the vehicle with the tester. |
| 3. |
Select the 'Current data" menu to search the current state of the input/output data.
The input/output data for the sensors corresponding to the A/C Pressure Transducer can be checked.
|
| Replacement |
| 1. |
Disconnect the negative (-) battery terminal. |
| 2. |
Recover the refrigerant with a recovery/charging station. |
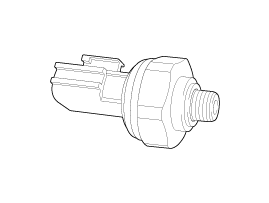
| 3. |
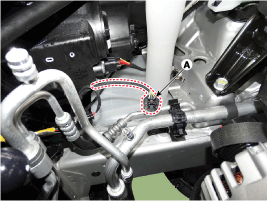
Disconnect the A/C pressure transducer connector (A).
|
| 4. |
Remove the A/C pressure transducer (A).
|


| 5. |
Install in the reverse order of removal.
|

 A/C Pressure Transducer Description and Operation
Description
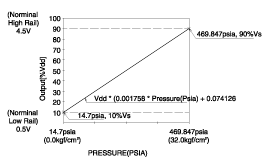
The A/C Pressure Transducer (APT) converts the pressure value
of high pressure line into voltage value after measuring it. By
converted voltage value, engine ECU controls the coolin ...
 Evaporator Temperature Sensor Description and Operation
Description
The evaporator temperature sensor will detect the evaporator
core temperature and interrupt compressor relay power in order to
prevent evaporator from freezing by excessive cooling. ...
Other information:
Hyundai Sonata LF 2014-2019 Service Manual: Fuel Pump Repair procedures
Inspection
[Fuel sender]
1.
Turn the ignition switch OFF, and then remove battery (-) cable.
2.
Remove the fuel pump assembly.
3.
Using an ohmmeter, measure the resistance between terminals 1 and 6 of sender connector (A) at each float level.
Pin No.Description1Fuel sender ground 2 ...
Hyundai Sonata LF 2014-2019 Service Manual: Evaporator Core Repair procedures
Replacement
1.
Disconnect the negative (-) battery terminal.
2.
After loosening the bolts remove the main crash pad and cowl cross bar assembly together.
(Refer to Heater -"Heater Unit")
3.
Remove the heater and blower assembly.
(Refer to Heater -"Heater Unit")
4.
Separate the blo ...
© 2018-2025 www.hsonatalf.org
