Hyundai Sonata: Engine And Transmission Assembly / Engine Mounting Repair procedures
Hyundai Sonata LF 2014-2019 Service Manual / Engine Mechanical System / Engine And Transmission Assembly / Engine Mounting Repair procedures
| Removal and Installation |
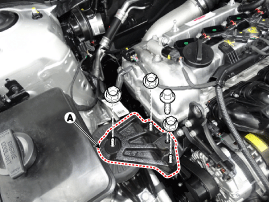
Rollroad Mounting
| 1. |
Rollroad bracket mounting bolts and rollroad bracket (A).
|
| 2. |
Remove the rollroad supprt bracket (A).
|
| 3. |
Install in the reverse order of removal. |
Engine Mounting Support Bracket
| 1. |
Remove the engine room under cover. |
| 2. |
Remove the reservoir tank.
(Refer to Cooling System - "Reservoir Tank") |
| 3. |
Install the jack to the edge of upper oil pan to support the engine.
|
| 4. |
Remove the engine mounting support bracket (A).
|
| 5. |
Install in the reverse order of removal. |
| 6. |
Remove the engine mounting bracket (A).
|
Transaxle Mounting Bracket
| 1. |
Remove the air cleaner assembly.
(Refer to Intake and Exhaust System - "Air Cleaner") |
| 2. |
Remove the battery and tray.
(Refer to Engine Electrical System - "Battery") |
| 3. |
Remove the ECM.
(Refer to Fuel System - "Engine Control Module") |
| 4. |
Remove the engine room under cover.
(Refer to Engine Room Under Cover - "Engine Room Under Cover") |
| 5. |
Install the jack to the edge of transaxle. |
| 6. |
Remove the service cover (A).
|
| 7. |
Remove the transaxle mounting bolts (A).
|
| 8. |
Remove the transaxle mounting bracket (A).
|
| 9. |
Install in the reverse order of removal. |
 Engine Mounting Components and Components Location
Components
1. Transaxle mounting bracket2. Roll road bracket3. Engine mounting bracket4. Engine mounting support bracket
...
 Engine And Transmission Assembly Repair procedures
Removal
1.
Remove the engine cover.
2.
Remove the battery and battery tray.
(Refer to Engine Electrical System - "Battery")
3.
Remove the air duct and air cleaner assembly.
(Refer to ...
Other information:
Hyundai Sonata LF 2014-2019 Owners Manual: Climate control additional features
Automatic Ventilation
When the ignition switch is in the ON position or when the engine is running
and outside temperature is below 59°F (15°C). At the same time, when A/C mode is
off and mode is Bi-Level or Floor mode with the recirculated air position selected
more than five minutes, the air ...
Hyundai Sonata LF 2014-2019 Service Manual: Special Service Tools
Special Service Tools
Tool (Number and name)IllustrationUse09880-4F000Hog ring clip installerHog ring clip installation
...
© 2018-2025 www.hsonatalf.org


